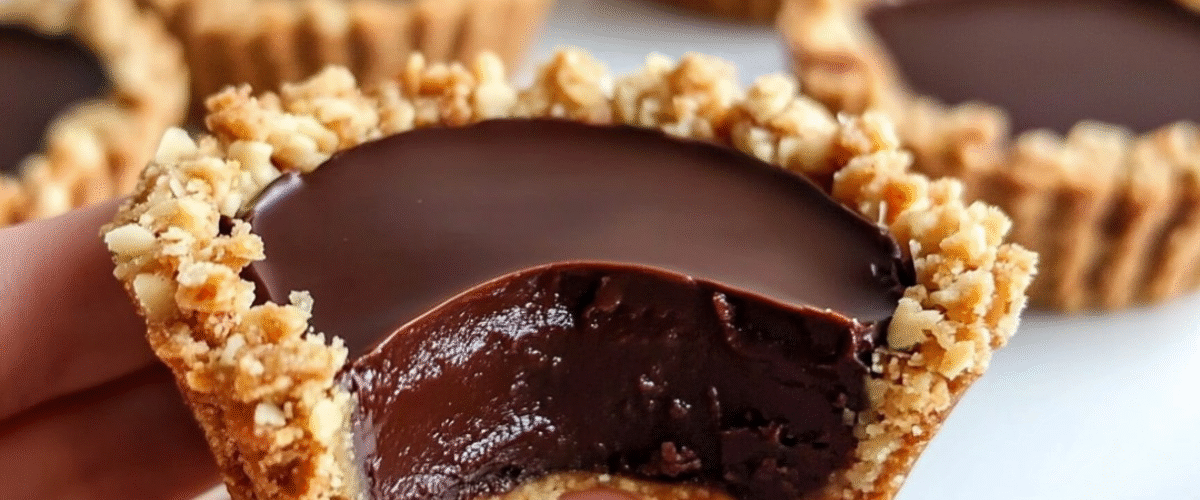
Cet incroyable dessert au chocolat sans cuisson révolutionnera votre approche des gourmandises maison. Avec seulement six ingrédients simples, vous pouvez créer d’élégantes coupes individuelles en chocolat, recouvertes d’une croûte croustillante aux amandes et d’une onctueuse ganache. Idéale pour un dessert exceptionnel sans allumer le four, cette recette offre un résultat digne d’un pâtissier en un minimum de temps et un maximum de saveurs.
Pourquoi ce dessert au chocolat sans cuisson est parfait
Les desserts au chocolat traditionnels nécessitent souvent de longs temps de cuisson, des techniques complexes ou des ingrédients rares comme la gélatine. Cette recette innovante élimine toutes ces complications tout en offrant un résultat exceptionnel. L’association de biscuits concassés et d’amandes crée une croûte naturellement liante qui conserve parfaitement sa forme, tandis que la riche ganache au chocolat offre une garniture gourmande ultime. L’absence de farine garantit une cuisson naturellement sans gluten avec des biscuits adaptés.
Ingrédients
Pour la croûte aux biscuits et aux amandes :
- 200 g (7,05 oz) de biscuits digestifs ou de biscuits Graham
- 80 g (2,79 oz) d’amandes crues
- 100 g (3,53 oz) de beurre non salé, fondu
Pour la ganache au chocolat :
- 150 g (5,29 oz) de chocolat noir (60-70 % de cacao), haché
- 90 g (3,14 oz) de crème épaisse
- 7 g (0,25 oz) de beurre non salé
Équipement nécessaire :
- Robot culinaire ou mixeur
- Moules à muffins ou à desserts individuels
- Petite casserole
- Bols à mélanger
Instructions étape par étape
Préparation de la base biscuit-amandes
Étape 1 : Préparation des amandes. Placez les amandes crues dans un robot culinaire et mixez jusqu’à ce qu’elles soient grossièrement hachées, mais pas réduites en poudre. Vous devez obtenir un mélange de petits morceaux et de morceaux légèrement plus gros pour la texture. Les amandes doivent conserver un peu de mordant tout en étant suffisamment petites pour bien se lier aux biscuits.
Étape 2 : Ajoutez les biscuits. Ajoutez les biscuits au robot culinaire avec les amandes hachées. Mixez par petites pulsations jusqu’à obtenir une consistance de chapelure grossière, avec quelques morceaux plus gros. La texture doit être variée, avec des miettes fines et des petits morceaux pour une texture en bouche intéressante.
Étape 3 : Incorporer le beurre. Faire fondre le beurre et le laisser refroidir légèrement pour éviter qu’il ne fonde complètement. Pendant que le robot est en marche, incorporer lentement le beurre fondu jusqu’à ce que le mélange commence à s’agglomérer sous la pression. Le mélange doit se tenir sous la pression, mais ne pas être trop humide.
Étape 4 : Testez la consistance. Prenez une petite poignée du mélange et pressez-la fermement. Elle doit se former en boule compacte sans s’effriter. Si elle est trop sèche, ajoutez un peu de beurre fondu, une cuillère à café à la fois. Si elle est trop humide, ajoutez quelques biscuits écrasés.
Former les coupes à dessert
Step 5: Prepare the Molds Line a muffin tin with paper liners or lightly grease individual dessert molds. You can also use silicone molds for easier removal. This recipe should make 6-8 individual servings depending on the size of your molds.
Step 6: Shape the Bases Divide the cookie-almond mixture evenly among the prepared molds. Using your fingers or the back of a spoon, press the mixture firmly into the bottom of each mold, creating a compact base layer approximately 1cm (½ inch) thick.
Step 7: Create the Walls Continue pressing the mixture up the sides of each mold to create cup-shaped containers. The walls should be sturdy enough to hold the ganache filling. Press firmly to ensure the structure won’t collapse when filled.
Step 8: Chill the Bases Place the formed bases in the refrigerator while you prepare the chocolate ganache. This initial chilling helps the bases set and maintain their shape when the warm ganache is added.
Preparing the Chocolate Ganache
Step 9: Heat the Cream Pour the cream into a small saucepan and heat over medium-low heat until it just begins to simmer. Small bubbles should form around the edges, but don’t let it come to a full boil as this can cause the ganache to break.
Step 10: Prepare the Chocolate While the cream heats, chop the chocolate into small, uniform pieces for even melting. Place the chopped chocolate in a heatproof bowl, ensuring the bowl is completely dry to prevent the chocolate from seizing.
Step 11: Create the Ganache Pour the hot cream over the chopped chocolate and let it sit for 2-3 minutes without stirring. This allows the heat to gently melt the chocolate. After the resting period, stir gently from the center outward until the mixture becomes smooth and glossy.
Step 12: Finish the Ganache Add the small amount of butter to the ganache and stir until completely incorporated. The butter adds extra richness and gives the ganache a beautiful shine. The finished ganache should be smooth, glossy, and coat the back of a spoon.
Final Assembly
Step 13: Fill the Cups Remove the chilled cookie bases from the refrigerator. Carefully spoon or pour the warm ganache into each cup, filling them nearly to the top. The contrast between the cool, set base and warm ganache creates the perfect texture combination.
Step 14: Level and Smooth Gently tap the molds on the counter to level the ganache and eliminate any air bubbles. Use a small offset spatula or the back of a spoon to smooth the surface if needed.
Step 15: Final Chill Return the filled dessert cups to the refrigerator and chill for at least 2 hours, or until the ganache is completely set. For firmer results, chill for 4 hours or overnight.
Nutritional Information and Timing
Preparation Time: 20 minutes Chilling Time: 2-4 hours Total Time: 2 hours 20 minutes to 4 hours 20 minutes Serves: 6-8 people Calories per serving: Approximately 385 calories
Nutritional Benefits: Each serving provides healthy fats from almonds and dark chocolate, along with antioxidants from cocoa. The almonds contribute protein, vitamin E, and magnesium, while dark chocolate offers flavonoids that support heart health.
Recipe Variations and Substitutions
Gluten-Free Version: Use certified gluten-free cookies or substitute with crushed gluten-free oats mixed with a tablespoon of cocoa powder for binding.
Nut-Free Alternative: Replace almonds with toasted seeds like sunflower or pumpkin seeds, or use additional cookies for a simpler base.
Flavor Variations: Add orange zest to the ganache for chocolate-orange cups, or incorporate a tablespoon of liqueur like rum, coffee liqueur, or amaretto for adult versions.
Different Chocolates: Experiment with milk chocolate for sweeter results or white chocolate for an elegant variation, adjusting cream quantities as needed for proper consistency.
Vegan Adaptation: Use vegan butter and coconut cream instead of dairy cream, ensuring your chocolate and cookies are also vegan-friendly.
Serving and Presentation Tips
These elegant dessert cups can be served directly in their molds for casual dining or carefully removed for more formal presentation. Garnish with fresh berries, a sprinkle of sea salt, chopped nuts, or a dollop of whipped cream. For special occasions, dust with edible gold powder or drizzle with contrasting chocolate.
Storage and Make-Ahead Benefits
These desserts are perfect for entertaining as they can be made 1-2 days in advance. Store covered in the refrigerator and bring to room temperature for 10-15 minutes before serving for optimal texture. They can also be frozen for up to one month, though the texture may be slightly different when thawed.
Professional Tips for Success
The key to perfect results lies in achieving the right consistency for both components. The cookie base should be moist enough to hold together but not so wet that it becomes soggy. The ganache should be smooth and glossy without any graininess, which can occur if the cream is too hot or if water gets into the chocolate.
Frequently Asked Questions
Can I use different types of cookies for the base? Absolutely! Graham crackers, digestive biscuits, vanilla wafers, or even chocolate cookies work well. Each will create a slightly different flavor profile. Avoid cookies that are too sweet if using sweet chocolate for the ganache.
Que faire si ma ganache devient granuleuse ou se sépare ? Une ganache granuleuse est généralement due à une surchauffe ou à une contamination par l’eau. Pour y remédier, incorporez progressivement une cuillère à soupe de crème chaude au fouet jusqu’à obtenir une consistance lisse. Pour éviter cela, utilisez des ustensiles secs et évitez de surchauffer la crème.
Comment savoir si les desserts sont bien pris ? La ganache doit être ferme au toucher et ne pas laisser de traces lorsqu’on appuie légèrement dessus. Sa surface doit être mate plutôt que brillante, signe d’une prise complète.
Puis-je faire des portions plus grandes ou plus petites ? Oui, ajustez la taille du moule en conséquence. Les portions plus grandes peuvent nécessiter un temps de réfrigération plus long, tandis que les plus petites prendront plus rapidement. La recette s’adapte bien à différentes tailles de portions.
Quelle est la meilleure façon de démouler les desserts ? Si vous utilisez des caissettes en papier, décollez-les simplement. Pour les moules rigides, trempez brièvement le fond dans de l’eau tiède pendant 5 à 10 secondes, puis retournez-les sur un plat de service. Les moules en silicone se démoulent généralement facilement en exerçant une légère pression.
Ce remarquable dessert au chocolat sans cuisson prouve qu’obtenir des résultats impressionnants ne nécessite pas toujours des techniques complexes ni de longs temps de préparation. L’alliance d’une base croquante et noisetée et d’une ganache au chocolat onctueuse crée un contraste de textures à la fois raffiné et gourmand. Que vous receviez des invités ou que vous vous offriez simplement un petit plaisir, ces élégantes coupes en chocolat offrent des résultats dignes d’une pâtisserie, tout en simplicité.