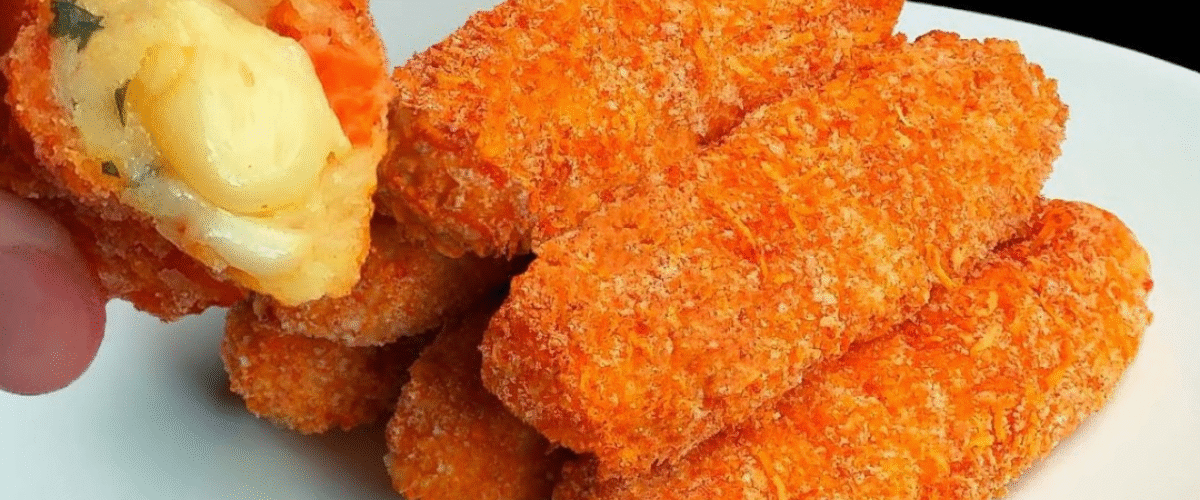
Ces incroyables bâtonnets de pommes de terre croustillants et sans friture révolutionnent la cuisine maison grâce à leur alliance parfaite entre santé et gourmandise. Utilisant des techniques de cuisson innovantes plutôt que la friture, cette recette offre tout le croquant et le cœur fondant dont vous rêvez, sans l’excès d’huile et de calories. Vos petits-enfants adoreront ces délices dorés et croustillants, comme s’ils sortaient tout droit du restaurant, mais préparés avec des ingrédients sains, dans votre cuisine.
Pourquoi ces bâtonnets de pommes de terre au fromage cuits au four changent la donne
Les bâtonnets de fromage frits traditionnels sont bourrés d’huiles malsaines et de calories excessives, mais cette méthode de cuisson innovante leur confère la même texture et le même goût irrésistibles, tout en conservant un plat nutritif et convivial. Le secret réside dans une panure parfaitement assaisonnée et une température de cuisson optimale, qui crée une belle croûte dorée tout en préservant la texture fondante et moelleuse du fromage.
Ingrédients
Pour les bâtonnets de pommes de terre au fromage :
- Pommes de terre : 600 g (1,3 lb / environ 4 pommes de terre moyennes)
- Carotte : 1 carotte moyenne (100 g / 3,5 oz)
- Eau : 500 ml (2 tasses) pour faire bouillir
- Beurre : 30 g (2 cuillères à soupe)
- Persil frais : 2 cuillères à soupe, finement haché
- Fromage à pâte dure ou mozzarella : 200 g (7 oz), coupé en bâtonnets
- Sel : 1 cuillère à café ou au goût
- Poivre noir : ½ cuillère à café fraîchement moulu
Pour la panure croustillante :
- Œufs : 2 gros œufs
- Chapelure : 150 g (1½ tasse) de chapelure fine
- Fromage râpé : 50 g (½ tasse) de parmesan ou similaire
- Paprika : 1 cuillère à café
- Farine tout usage : 4 cuillères à soupe (60 g / 2 oz)
Pour la salade de chou frais :
- Chou blanc : 200 g (7 oz / environ 2 tasses râpé)
- Carotte : 1 carotte moyenne, coupée en julienne
- Concombre : 1 concombre moyen, coupé en fines tranches
- Jus de citron frais : 2 cuillères à soupe
- Huile végétale : 2 cuillères à soupe
- Sel : ½ cuillère à café ou au goût
Pour la sauce crémeuse aux herbes :
- Crème fraîche ou yaourt grec : 3 cuillères à soupe (45 ml)
- Aneth frais : 1 cuillère à soupe, finement haché
- Ail : 1 gousse, hachée
- Sel : ¼ cuillère à café
- Poivre noir : pincée
- Jus de citron frais : 1 cuillère à café
Instructions étape par étape
Préparation de la base de pommes de terre
Step 1: Cook the Vegetables Peel and dice the potatoes and carrot into even chunks. Place them in a large pot with 500ml of water and 1 teaspoon of salt. Bring to a boil over high heat, then reduce to medium-high and cook for 15-20 minutes until completely tender and easily pierced with a fork.
Step 2: Create the Potato Mixture Drain the cooked vegetables thoroughly and return them to the pot. Add the butter and mash until completely smooth and creamy. Stir in the finely chopped parsley, and season with salt and black pepper to taste. Allow the mixture to cool for 10 minutes until it’s comfortable to handle.
Step 3: Form the Cheese Sticks Take about 2 tablespoons of the cooled potato mixture and flatten it in your palm. Place a piece of cheese in the center and carefully wrap the potato mixture around it, forming a stick shape about 10cm (4 inches) long. Ensure the cheese is completely enclosed. Repeat until all mixture is used, making approximately 12-15 sticks.
Creating the Perfect Coating
Step 4: Set Up Coating Station Prepare three shallow dishes for the coating process. In the first dish, place the flour. In the second dish, beat the eggs until smooth. In the third dish, combine breadcrumbs, grated cheese, and paprika, mixing well to distribute the seasonings evenly.
Step 5: Coat the Sticks Working with one stick at a time, first roll it in flour, shaking off any excess. Next, dip it into the beaten eggs, ensuring complete coverage. Finally, roll it in the seasoned breadcrumb mixture, pressing gently to help the coating adhere. Place the coated sticks on a parchment-lined baking sheet.
Baking to Golden Perfection
Step 6: Bake the Sticks Preheat your oven to 200°C (400°F / Gas Mark 6). Lightly spray or brush the coated sticks with a small amount of oil for extra crispiness. Bake for 20-25 minutes, turning once halfway through, until they’re golden brown and crispy on all sides.
Preparing the Accompaniments
Step 7: Make the Fresh Salad While the sticks are baking, prepare the refreshing cabbage salad. Finely shred the cabbage and julienne the carrot. Thinly slice the cucumber. In a large bowl, combine all the vegetables. Whisk together lemon juice, vegetable oil, and salt, then toss with the vegetables. Let it sit for 10 minutes to allow the flavors to meld.
Step 8: Create the Herb Sauce In a small bowl, combine sour cream or yogurt with minced garlic, chopped dill, salt, pepper, and lemon juice. Mix thoroughly and refrigerate until ready to serve. This sauce can be made up to 2 days in advance.
Nutritional Information and Timing
Preparation Time: 30 minutes Cooking Time: 25 minutes Total Time: 55 minutes Servings: 4-6 people (12-15 sticks)
Nutritional Profile (per stick):
- Calories: Approximately 165
- Protein: 8g
- Carbohydrates: 22g
- Fat: 5g
- Fiber: 2g
- Calcium: High (from cheese)
- Vitamin A: Good source (from carrots)
- Vitamin C: Moderate (from potatoes)
- Potassium: Excellent source
Delicious Variations and Substitutions
Cheese Variations
Experiment with different cheese types to create unique flavor profiles. Sharp cheddar provides a bold taste, while cream cheese creates an ultra-creamy center. For a gourmet twist, try using brie or camembert, or combine multiple cheeses for complex flavors.
Herb and Spice Combinations
Enhance the potato mixture with different herbs and spices. Italian seasoning, garlic powder, or onion powder add wonderful depth. For a Mediterranean twist, include oregano and basil. Smoked paprika in the coating creates a subtle smoky flavor.
Vegetable Additions
Incorporate finely diced vegetables into the potato mixture for extra nutrition and flavor. Sautéed onions, bell peppers, or mushrooms work beautifully. Spinach or other leafy greens can be wilted and chopped finely before mixing in.
Gluten-Free Option
Replace regular breadcrumbs with gluten-free breadcrumbs or finely ground nuts like almonds or hazelnuts. Substitute the flour with cornstarch or gluten-free flour blend for a completely gluten-free version.
Protein Boosters
For extra protein, consider adding finely diced ham, bacon bits, or cooked chicken to the potato mixture. These additions complement the cheese beautifully and create a more substantial snack or meal.
Frequently Asked Questions
Can I prepare these potato cheese sticks in advance? Yes! You can assemble and coat the sticks up to 24 hours ahead of time. Store them covered in the refrigerator and bake just before serving. You can also freeze the coated, unbaked sticks for up to 3 months. Bake directly from frozen, adding 5-10 extra minutes to the cooking time.
What’s the secret to preventing the cheese from leaking out? The key is ensuring the potato mixture is completely cooled before shaping and making sure the cheese is completely enclosed with no thin spots. Also, don’t skip the flour coating step, as it helps seal the surface before the egg and breadcrumb coating.
Can I use sweet potatoes instead of regular potatoes? Absolutely! Sweet potatoes create a deliciously different flavor profile and add extra nutrients. The cooking method remains the same, though sweet potatoes may take slightly less time to cook through.
Comment obtenir une panure croustillante sans friture ? Le secret : utiliser une chapelure fine mélangée à du fromage râpé et bien préchauffer votre four. Un léger coup d’huile avant la cuisson permet d’obtenir une croûte dorée et croustillante. Retourner les bâtonnets à mi-cuisson assure une coloration uniforme.
Quelles autres sauces accompagnent bien ces bâtonnets ? Outre la sauce aux herbes, ces bâtonnets sont délicieux avec une sauce marinara, une sauce ranch, de la moutarde au miel ou une mayonnaise épicée. Pour une option plus saine, essayez-les avec du houmous ou une sauce tzatziki au yaourt.
Conseils de conservation et de service
Ces bâtonnets de pommes de terre au fromage sans friture sont meilleurs servis immédiatement, tant que la panure est croustillante et que le fromage est encore chaud et moelleux. Cependant, les restes peuvent être conservés au réfrigérateur jusqu’à 3 jours et réchauffés au four à 180 °C (350 °F) pendant 8 à 10 minutes pour retrouver leur croustillant.
La salade qui l’accompagne offre un contraste rafraîchissant avec les bâtonnets riches et crémeux et peut être préparée plusieurs heures à l’avance. La sauce aux herbes gagne en saveur lorsqu’on la laisse reposer, ce qui la rend idéale pour la préparation des repas.
Pour vos réceptions, ces bâtonnets peuvent être conservés au chaud dans un four doux (150 °C / 300 °F) jusqu’à 30 minutes après la cuisson. Disposez-les sur une plaque chauffante ou dans une mijoteuse, en position « chaud », pour les fêtes.
Cette méthode révolutionnaire sans friture prouve qu’il n’est pas nécessaire de sacrifier la santé au profit du goût. Ces bâtonnets de pommes de terre au fromage, croustillants et dorés, offrent tout le plaisir des versions frites traditionnelles, tout en étant cuits à la perfection. Votre famille sera étonnée de voir qu’un plat aussi délicieux peut être préparé sans une goutte d’huile de friture, faisant de cette recette un incontournable de votre répertoire de plats sains et réconfortants.