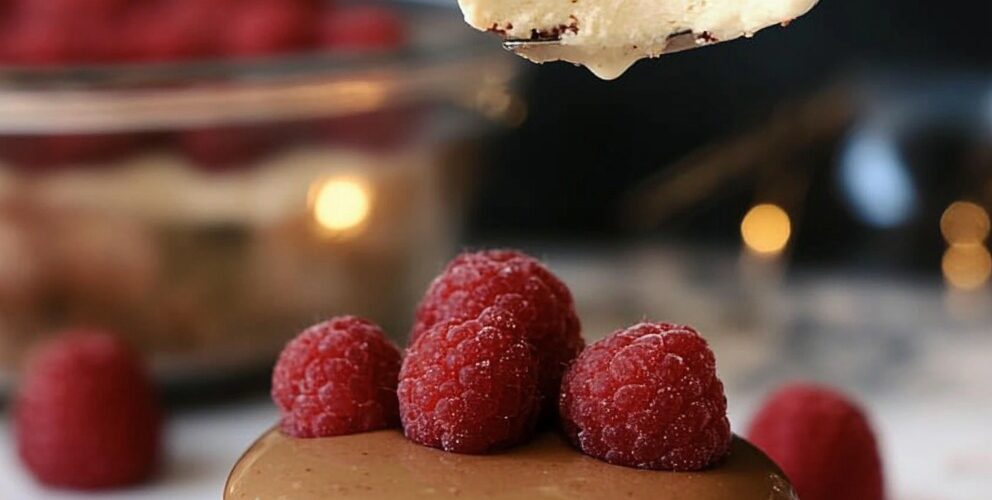
Un dessert italien classique avec une touche de chocolat
La panna cotta, qui signifie « crème cuite » en italien, est depuis longtemps considérée comme l’un des desserts les plus élégants et pourtant étonnamment simples d’Italie. Originaire du Piémont, au nord du pays, cette crème onctueuse a évolué de ses humbles débuts à une gourmandise raffinée que l’on retrouve dans les restaurants haut de gamme du monde entier. Notre variante au chocolat, agrémentée de framboises fraîches, sublime ce classique en alliant la texture onctueuse et délicate de la panna cotta traditionnelle à la richesse gourmande du chocolat.
Ce qui rend ce dessert si spécial, c’est son attrait visuel époustouflant, allié à une simplicité remarquable. Le contraste saisissant entre la base crémeuse en chocolat blanc et la couche supérieure brillante en chocolat au lait crée un magnifique support pour les framboises d’un rouge éclatant. Malgré son aspect impressionnant, la panna cotta ne nécessite aucune cuisson, ce qui la rend parfaite pour les chaudes soirées d’été ou comme dessert à préparer à l’avance pour vos réceptions.
La clé d’une panna cotta parfaite réside dans l’obtention d’une texture idéale : suffisamment ferme pour conserver sa forme une fois démoulée, mais suffisamment délicate pour frémir légèrement à chaque cuillerée. L’ajout de chocolat blanc à notre base crée une texture plus riche en bouche tout en sublimant l’acidité naturelle des framboises fraîches. Recouvert d’une onctueuse couche de chocolat au lait qui craque agréablement sous la cuillère, ce dessert offre une multitude de textures et de saveurs à chaque bouchée.
Que ce soit pour un dîner romantique, un dîner entre amis ou simplement pour vous faire plaisir, cette panna cotta au chocolat et aux framboises fraîches vous impressionnera à coup sûr, tant par son aspect visuel que par son goût. Plongeons dans la création de ce chef-d’œuvre italien dans votre cuisine.
Ingrédients
Pour la base de panna cotta :
- 2 tasses (480 ml) de crème épaisse
- 1 tasse (240 ml) de lait entier
- ⅓ tasse (67 g) de sucre granulé
- 2 cuillères à café (10 ml) d’extrait de vanille pur
- 2½ cuillères à café (7,5 g) de gélatine en poudre sans saveur
- 3 cuillères à soupe (45 ml) d’eau froide
- 113 g (4 oz) de chocolat blanc de haute qualité, finement haché
Pour la garniture :
- 57 g (2 oz) de chocolat au lait, haché
- 1 tasse (125 g) de framboises fraîches
- 2 cuillères à soupe (15 g) de cacao en poudre non sucré, pour saupoudrer
Instructions
Étape 1 : Préparez la gélatine
- Versez l’eau froide dans un petit bol et saupoudrez la poudre de gélatine uniformément sur la surface.
- Laissez reposer la gélatine sans la remuer pendant 5 minutes pour qu’elle gonfle (ramollisse et absorbe l’eau). Elle devrait être complètement saturée et prendre un aspect translucide et gonflé.
Étape 2 : Chauffer le mélange de crème
- Dans une casserole moyenne, mélanger la crème épaisse, le lait entier et le sucre cristallisé.
- Placez sur feu moyen-doux et réchauffez le mélange en remuant de temps en temps pour dissoudre complètement le sucre.
- Bring the mixture to a gentle simmer (small bubbles should form around the edges), but do not allow it to boil as high heat can damage the cream’s texture.
- Once simmering, remove the saucepan from the heat.
Step 3: Incorporate Gelatin and White Chocolate
- Add the bloomed gelatin to the hot cream mixture and whisk gently until the gelatin completely dissolves, about 1-2 minutes.
- Add the chopped white chocolate to the mixture.
- Whisk continuously until the chocolate melts fully and the mixture becomes smooth with no visible chocolate pieces.
- Stir in the vanilla extract until well combined.
Step 4: Strain and Pour
- For an extra silky texture, strain the mixture through a fine-mesh sieve into a large measuring cup or bowl with a pouring spout.
- Divide the mixture evenly among 6-8 ramekins, small glasses, or dessert cups depending on your preferred serving size.
- Gently tap each container against the counter to release any air bubbles that may have formed.
Step 5: Chill Until Set
- Allow the panna cottas to cool to room temperature, about 20-30 minutes.
- Cover each container with plastic wrap, making sure the plastic doesn’t touch the surface of the cream to prevent skin formation.
- Refrigerate for at least 4 hours, preferably overnight, until the panna cottas are completely set but still maintain a slight wobble in the center.
Step 6: Prepare the Chocolate Topping
- Once the panna cottas are fully set, prepare the chocolate topping.
- Place the chopped milk chocolate in a microwave-safe bowl.
- Heat in 20-second intervals at 50% power, stirring between each interval until the chocolate is almost completely melted.
- Remove and continue stirring until the remaining chocolate melts from the residual heat. This prevents overheating and ensures a smooth consistency.
Step 7: Assemble and Garnish
- Spoon a thin layer of melted milk chocolate over each panna cotta, tilting to create an even coating.
- Return to the refrigerator for 5-10 minutes to allow the chocolate to set slightly but not become completely hard.
- Arrange 3-4 fresh raspberries on top of each dessert.
- Just before serving, dust the plates with cocoa powder using a small sieve for an elegant presentation.
Nutritional Information and Timing
Preparation Time: 20 minutes
Chilling Time: Minimum 4 hours (preferably overnight)
Assembly Time: 15 minutes
Total Time: 4 hours 35 minutes
Servings: 6-8 individual portions
Nutritional Information (per serving, based on 6 servings):
- Calories: 425 kcal
- Protein: 5 g
- Carbohydrates: 25 g
- Fat: 35 g
- Saturated Fat: 22 g
- Cholesterol: 120 mg
- Fiber: 2 g
- Sugar: 20 g
- Sodium: 60 mg
Note: Nutritional values are approximate and may vary based on specific ingredients used.
Cooking Tips and Tricks
For Perfect Panna Cotta Every Time:
- The Gelatin Test: To ensure your panna cotta will set properly, perform the “spoon test” before pouring into molds. Dip a spoon into the mixture and run your finger across the back—if it leaves a clear path, your mixture is properly thickened.
- Temperature Control: Never boil the cream mixture, as high temperatures can break down the gelatin’s setting properties and affect the final texture. A gentle simmer is all you need.
- Chocolate Selection: Use high-quality chocolate for both the base and topping. Lower quality chocolates contain more additives and less cocoa butter, which can affect both flavor and texture.
- Unmolding Technique: If you plan to unmold your panna cottas rather than serving them in their containers, dip the bottom of each ramekin in hot water for 3-5 seconds, then run a thin knife around the edge before inverting onto a plate.
- Gelatin Precision: Measure your gelatin carefully—too much will create a rubbery texture, while too little will result in panna cotta that doesn’t hold its shape.
- Smooth Chocolate Layer: For an extra glossy chocolate top layer, add ½ teaspoon of neutral oil (like grapeseed) to the melted chocolate before spreading it on top.
- Prevent Skin Formation: If not covering with plastic wrap while chilling, dust the surface with a tiny amount of powdered sugar to prevent skin from forming.
- Serve at the Right Temperature: Remove panna cottas from the refrigerator 10-15 minutes before serving to allow the flavors to fully develop at a slightly warmer temperature.
Variations and Substitutions
Alternative Flavor Profiles:
- Dark Chocolate Version: Replace the white chocolate in the base with 3 oz (85 g) of dark chocolate (70% cocoa content) for a more intense chocolate flavor. Use white chocolate for the top layer to create a striking reverse color contrast.
- Dairy-Free Option: Substitute the heavy cream and milk with full-fat coconut milk and coconut cream. Use dairy-free chocolate for both the base and topping. Increase the gelatin to 3 teaspoons for proper setting.
- Coffee Infusion: Add 1 tablespoon of instant espresso powder to the cream mixture before heating for a mocha-flavored panna cotta that pairs beautifully with the chocolate and raspberries.
- Liqueur Enhancement: Replace 1 tablespoon of the milk with Chambord (raspberry liqueur), Grand Marnier, or Frangelico for an adult version with subtle complexity.
- Berry Variation: Replace raspberries with a mixture of seasonal berries like strawberries, blackberries, and blueberries for a colorful medley.
Ingredient Substitutions:
- Sugar Alternatives: Replace granulated sugar with an equal amount of honey or maple syrup for different flavor notes. If using liquid sweeteners, reduce the milk by 1 tablespoon.
- Gelatin Substitutes: For a vegetarian version, substitute the gelatin with 2 tablespoons of agar-agar powder, but note that the texture will be slightly different.
- Light Version: Use half-and-half instead of heavy cream and 2% milk instead of whole milk for a lighter dessert with approximately 30% fewer calories.
- Chocolate Substitutions: Ruby chocolate can replace white chocolate in the base for a naturally pink hue and subtle berry flavor that complements the raspberries beautifully.
- Garnish Alternatives: Instead of cocoa powder, try finely chopped pistachios, toasted coconut flakes, or edible gold dust for different visual effects and flavor combinations.
Common FAQs
Q1: Why didn’t my panna cotta set properly?
A: Several factors can prevent proper setting. The most common include: not allowing the gelatin to bloom completely before adding it to the warm mixture; overheating the cream mixture (which damages the gelatin’s setting properties); or incorrect gelatin measurement. Remember that gelatin strength can vary by brand, so you might need to adjust slightly based on the specific product you’re using.
Q2: Can I make chocolate panna cotta ahead of time?
A: Absolutely! Panna cotta is the perfect make-ahead dessert. You can prepare it up to 3 days in advance and keep it covered in the refrigerator. Add the chocolate topping and berries no more than 24 hours before serving for the freshest presentation.
Q3: My chocolate topping cracked when I tried to eat the panna cotta. Is this normal?
A: Yes, the chocolate layer is supposed to create a slight crack when your spoon breaks through it—similar to a crème brûlée’s caramelized sugar top. If you prefer a softer topping, add 1 teaspoon of heavy cream to your melted chocolate before spreading it on the panna cotta.
Q4: Can I freeze panna cotta for longer storage?
A: While technically possible, freezing isn’t recommended as it can alter the delicate texture of panna cotta. The gelatin structure may break down during thawing, resulting in a grainy or separated dessert. This recipe is best enjoyed fresh within 3-4 days of preparation.
Q5: How do I know when my panna cotta is perfectly set?
A: A properly set panna cotta should have a slight wobble in the center when gently shaken—similar to Jell-O but more delicate. It should hold its shape when unmolded but still retain a creamy, silky texture when you put your spoon through it. If it’s completely firm with no movement, it may be overcooked or contain too much gelatin.
Storage and Make-Ahead Tips
Refrigerator Storage:
- Conservez les panna cottas préparées, recouvertes d’une pellicule plastique, au réfrigérateur jusqu’à 3 jours.
- Pour un attrait visuel optimal, ajoutez la garniture au chocolat au plus tard 24 heures avant de servir.
- Ajoutez des framboises fraîches juste avant de servir pour éviter qu’elles ne libèrent du jus sur la couche de chocolat.
Préparation des composants à l’avance :
- La base de panna cotta peut être préparée et versée dans des plats de service jusqu’à 3 jours à l’avance.
- Le nappage au chocolat peut être préparé séparément et conservé dans un récipient hermétique à température ambiante jusqu’à deux jours. Réchauffez-le doucement au micro-ondes à 50 % de puissance par intervalles de 15 secondes jusqu’à ce qu’il soit facile à tartiner.
Servir à partir du stockage :
- Pour une texture et une saveur optimales, retirez les panna cottas du réfrigérateur 10 à 15 minutes avant de servir.
- Si la couche de chocolat a été réfrigérée pendant plus de quelques heures, la laisser se réchauffer légèrement renforcera le contraste entre la panna cotta froide et la garniture au chocolat.
Conseils de transport :
- Pour les repas partagés ou les dîners entre amis, transportez les panna cottas dans leurs contenants d’origine (sans les démouler).
- Transportez les framboises fraîches et la poudre de cacao séparément et assemblez-les juste avant de servir.
- Placez les contenants individuels dans un plat de cuisson peu profond avec une couche de papier absorbant pour éviter qu’ils ne bougent pendant le transport.
Raviver les restes de panna cotta :
- Si la panna cotta commence à suinter ou à libérer du liquide après plusieurs jours, servez-la avec le liquide comme sauce ou remuez-la délicatement dans le dessert.
- Transformez les restes de panna cotta en un milkshake luxueux en le mélangeant avec une petite quantité de lait et de glace.
Cette panna cotta au chocolat et aux framboises fraîches allie tradition italienne et élégance moderne. Le contraste entre la base onctueuse en chocolat blanc, le dessus croquant en chocolat au lait et les framboises acidulées et lumineuses crée un dessert visuellement époustouflant et parfaitement équilibré en saveurs. Que ce soit pour impressionner vos invités ou pour vous faire plaisir, ce dessert raffiné offre un résultat digne d’un restaurant avec un minimum d’effort. Préparée à l’avance, la panna cotta est également idéale pour recevoir, vous permettant de vous concentrer sur vos moments conviviaux plutôt que sur la préparation du dessert de dernière minute.