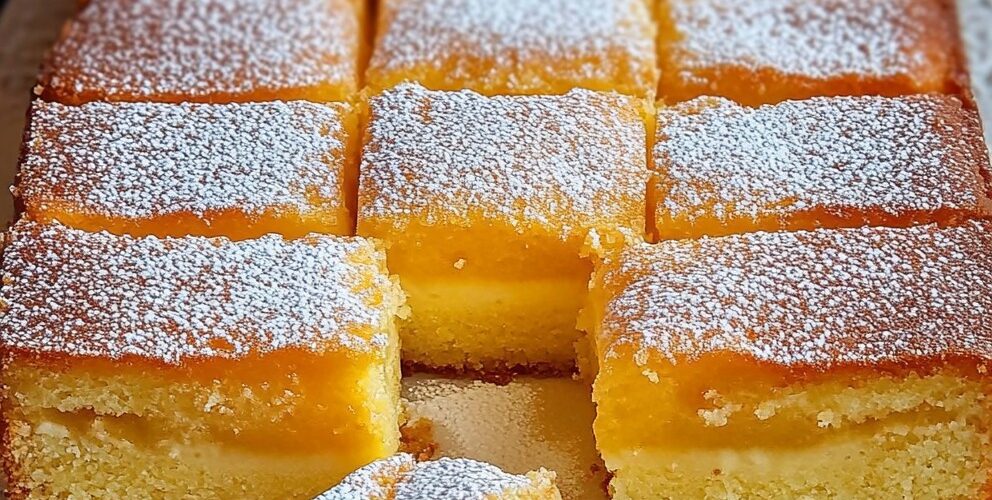
L’histoire ensoleillée derrière ces délices aux agrumes et aux pommes
Il y a quelque chose de magique dans l’association des pommes acidulées et du citron vif, qui transforme un simple gâteau en un délice. Ces carrés citron-pommes ornent les repas de famille et les tables de fêtes depuis des générations, nés dans les cuisines d’Europe centrale où des pâtissiers ingénieux savaient tirer le meilleur parti des fruits de saison. Ce qui n’était au départ qu’une humble façon de préserver les saveurs des pommes d’automne est devenu cet élégant dessert qui équilibre parfaitement les notes sucrées, acidulées et beurrées à chaque bouchée.
La beauté de ces carrés réside dans leur polyvalence. Suffisamment élégants pour les grandes occasions et suffisamment simples pour un dessert en semaine, ils allient simplicité et sophistication. Leur fond de gâteau fondant, infusé à la vanille, constitue la base idéale pour une délicate garniture aux pommes, agrémentée de jus de citron frais et de cannelle réconfortante. Le dernier saupoudrage de sucre glace apporte non seulement une touche de douceur, mais transforme également ces carrés en un dessert visuellement époustouflant qui ne manquera pas d’impressionner.
Que vous soyez un pâtissier chevronné ou que vous vous initiiez aux douceurs maison pour la première fois, ces carrés citron-pomme sont accessibles, inratables et deviendront assurément un incontournable de votre répertoire de desserts. Plongeons dans cette délicieuse recette qui incarne l’essence même de la pâtisserie réconfortante.
Ingrédients
Pour la garniture aux pommes :
- 1 grosse pomme (environ 200 g/7 oz)
- Jus d’un demi-citron (environ 2 cuillères à soupe/30 ml)
- 1 cuillère à soupe (15 g) de sucre cristallisé
- 1 cuillère à soupe (14 g) de beurre non salé
- ¼ cuillère à café de cannelle moulue
- 1 cuillère à soupe (20 g) de confiture d’abricots
Pour la pâte à gâteau :
- 3 gros œufs, à température ambiante
- 150 g (¾ tasse) de sucre cristallisé
- Une pincée de sel (⅛ cuillère à café)
- 8 g (1 sachet/2 cuillères à café) de sucre vanillé ou 1 cuillère à café d’extrait de vanille
- 120 ml (½ tasse) d’huile végétale ou de canola
- 150 ml (⅔ tasse) de lait entier
- 250 g (2 tasses) de farine tout usage
- 16 g (4 cuillères à café) de levure chimique
Pour la décoration :
- 2-3 cuillères à soupe (15-30 g) de sucre glace
Instructions étape par étape
Préparation de la garniture aux pommes :
- Préchauffez votre four à 180 °C. Chemisez un moule carré de 23 x 23 cm (9 x 9 pouces) de papier sulfurisé, en laissant dépasser un peu sur les bords pour faciliter le démoulage.
- Préparez la pomme : Pelez, épépinez et coupez la pomme en tranches fines et uniformes (environ 0,6 cm d’épaisseur). Placez les tranches de pomme dans un bol moyen.
- Ajoutez de l’acidité : Versez immédiatement le jus de citron sur les tranches de pomme et mélangez délicatement pour les enrober. Cela évite le brunissement et ajoute une touche de saveur vive.
- Sweeten the filling: Sprinkle the tablespoon of sugar over the apple slices and mix well to ensure even distribution.
- Melt the butter: In a small saucepan over medium-low heat, melt the butter until just liquified.
- Create the apple filling: Add the apple slices to the melted butter in the saucepan. Sprinkle with cinnamon and cook for 2-3 minutes, stirring occasionally, until the apples begin to soften but still maintain their shape.
- Incorporate the jam: Remove the pan from heat and stir in the apricot jam until the apple slices are evenly coated. Set aside to cool slightly while preparing the cake batter.
Making the Cake Batter:
- Mix wet ingredients: In a large mixing bowl, beat the eggs and sugar with an electric mixer on medium-high speed for 2-3 minutes until pale and frothy. Add the salt and vanilla sugar (or extract) and beat for another 30 seconds.
- Add liquids: With the mixer on low speed, slowly pour in the oil in a steady stream, allowing it to incorporate fully. Then gradually add the milk, continuing to mix until combined.
- Incorporate dry ingredients: In a separate bowl, whisk together the flour and baking powder. Gradually add this dry mixture to the wet ingredients, mixing on low speed just until incorporated. Be careful not to overmix; a few small lumps are fine.
- Assemble the cake: Pour approximately ⅔ of the batter into the prepared baking pan, spreading it evenly with a spatula.
- Add the apple layer: Arrange the cooled apple slices in an even layer over the batter, ensuring they’re distributed uniformly.
- Top with remaining batter: Carefully pour the remaining batter over the apple layer, using a spatula to gently spread it to the edges of the pan. Don’t worry if some apple pieces peek through.
Baking and Finishing:
- Bake to perfection: Place the pan in the preheated oven and bake for 30-35 minutes, or until a toothpick inserted into the center comes out clean or with a few moist crumbs (not wet batter).
- Cool properly: Remove from the oven and allow the cake to cool in the pan for 15 minutes. Then, using the parchment paper overhang, lift the cake out of the pan and transfer to a wire rack to cool completely (approximately 1 hour).
- Final touch: Once cooled, dust generously with powdered sugar using a fine-mesh sieve.
- Serve: Cut into 16 squares (4×4 grid) and serve at room temperature for the best flavor and texture.
Nutritional Information and Timing
Prep Time: 20 minutes
Cook Time: 35 minutes
Cooling Time: 1 hour 15 minutes
Total Time: 2 hours 10 minutes
Yield: 16 squares
Nutritional Information (per square):
- Calories: 195
- Total Fat: 9g
- Saturated Fat: 2g
- Cholesterol: 40mg
- Sodium: 110mg
- Total Carbohydrates: 27g
- Dietary Fiber: 1g
- Sugars: 15g
- Protein: 3g
Please note that nutritional information is an estimate and may vary based on specific ingredients used.
Pro Baking Tips and Tricks
- Room temperature ingredients matter: Allow eggs and milk to come to room temperature before mixing for a smoother, more voluminous batter.
- Don’t skip the lemon: The acidity not only prevents the apples from browning but also adds an essential flavor contrast that elevates the entire dessert.
- Control apple moisture: If your apple variety is particularly juicy, pat the slices dry with a paper towel after cooking to prevent excess moisture from affecting the cake’s texture.
- Parchment paper precision: For clean removal and perfect edges, cut the parchment paper to fit the bottom of the pan with extra extending up two opposite sides as “handles.”
- The toothpick test: When checking for doneness, insert a toothpick in the center where the cake is thickest. A few moist crumbs are ideal; a completely clean toothpick might indicate the cake is slightly overbaked.
- Sifting makes a difference: Always sift your powdered sugar for the final dusting to avoid clumps and achieve that professional bakery-style finish.
- Cooling patience: Resist the temptation to cut into the cake while still warm. Complete cooling allows the flavors to develop and ensures clean, beautiful slices.
Variations and Substitutions
Different Fruit Options:
- Pear Perfection: Substitute ripe but firm pears for apples for a more delicate flavor profile.
- Berry Beautiful: Add a handful of fresh blueberries or raspberries alongside the apple for bursts of color and tartness.
- Stone Fruit Sensation: During summer months, sliced peaches or nectarines work beautifully in place of apples.
Dietary Adjustments:
- Dairy-Free: Substitute almond or oat milk for whole milk, and use a plant-based buttery spread instead of butter.
- Reduced Sugar: Decrease the sugar in the cake batter to 120g (approximately ⅔ cup) for a less sweet option.
- Gluten-Free: Replace all-purpose flour with a 1:1 gluten-free baking flour blend, but note that the texture may be slightly different.
Flavor Enhancements:
- Nutty Addition: Fold ½ cup of chopped walnuts or pecans into the batter for added texture and flavor.
- Spice It Up: Enhance the warming notes by adding ¼ teaspoon of nutmeg or cardamom to the apple filling.
- Citrus Zest: Add the zest of one lemon to the cake batter for an extra punch of brightness.
- Caramel Drizzle: Once cooled, drizzle caramel sauce over the top instead of (or in addition to) the powdered sugar.
Common FAQs
Q: Can I make these Lemon Apple Squares ahead of time?
A: Absolutely! These squares actually develop even better flavor after resting overnight. You can prepare them up to 2 days in advance, storing in an airtight container at room temperature. Add the powdered sugar just before serving for the freshest appearance.
Q: My cake sank in the middle. What went wrong?
A: This is typically caused by opening the oven door too early during baking. Wait until at least 25 minutes have passed before checking for doneness. Another common cause is using too much apple filling, which can weigh down the center of the cake.
Q: Can I freeze these Lemon Apple Squares?
A: Yes! These squares freeze beautifully for up to 3 months. Cut into portions, place parchment paper between layers, and store in an airtight container. Thaw overnight in the refrigerator and bring to room temperature before serving. Add fresh powdered sugar after thawing.
Q: What are the best apple varieties to use for this recipe?
A: Firm, tart apples like Granny Smith, Honeycrisp, or Pink Lady work best as they hold their shape during cooking and provide a nice contrast to the sweet cake. Avoid softer varieties like McIntosh that can become mushy.
Q: Can I double this recipe for a larger crowd?
A: Yes, you can double the recipe and bake in a 9×13 inch (23×33 cm) rectangular pan. Increase the baking time by about a5-10 minutes, but be sure to use the toothpick test to confirm doneness.
Storage and Make-Ahead Tips
Room Temperature:
Store cooled, completely finished squares in an airtight container at room temperature for up to 3 days. Place parchment paper between layers to prevent sticking.
Refrigeration:
If your kitchen is particularly warm or humid, you can refrigerate the squares for up to 5 days. Allow them to come to room temperature for 20-30 minutes before serving for the best texture and flavor.
Freezing Instructions:
- Ensure squares are completely cooled.
- Wrap individual squares in plastic wrap, then aluminum foil.
- Place wrapped squares in a freezer-safe container or ziplock bag.
- Freeze for up to 3 months.
- Thaw overnight in the refrigerator, then bring to room temperature before serving.
- Re-dust with fresh powdered sugar after thawing for the best presentation.
Make-Ahead Components:
If you’re short on time, you can prepare the apple filling up to 24 hours in advance and store it in the refrigerator in an airtight container. Bring to room temperature before assembling the cake.
These Lemon Apple Squares capture the perfect balance of sweet, tart, and comforting flavors in every bite. The contrast between the tender cake and the soft apple layer creates a textural experience that keeps you coming back for more. Whether served as an afternoon treat with coffee or as the grand finale to a special meal, these squares are sure to become a beloved addition to your recipe collection. Happy baking!